Homemade Ranch Dressing, Week 1 October Unprocessed

So I made it through week one of October Unprocessed “mostly” unprocessed. Mainly I just refrained from eating overly processed foods in the house which led to me just eating less….Haha!

I did put together some homemade ranch for a really delicious salad and the recipe I used makes enough for several batches! This is a yummy dilly style ranch dressing. The dressing taste amazing but is rather runny so next time I will add a little sour cream or use buttermilk to thicken it slightly.

Homemade Ranch Dressing

First you are going to want The Homemade Ranch Dressing Seasoning recipe, click the link or see recipe below.

To make the dressing:

  • 2 Tablespoons Ranch Dressing Seasoning
  • 1 Cup mayonnaise
  • 1/2 Cup Whole Milk
  • 1/2 Cup Sour Cream
  1. Mix all ingredients in a glass jar and shake vigorously! Refrigerate until ready to eat.
  2. Eat and Enjoy.

Dressing will keep for about two weeks. Store extra seasoning in your cupboard 🙂

*~* Note *~*

You can replace the sour cream and milk with drained plain yogurt, or you can use all sour cream or buttermilk. Get crazy up in there!

Also, you may replace the dried dill with 1 tablespoon of fresh when preparing dressing. I also like to add fresh green onions… because I just love them.

[gmc_recipe 2120]

Happy Cooking

♄

Samantha

Easy Breakfast Cups

Image

I was feeling particularly domestic the other morning and busted out some blueberry muffins AND some delicious bacon and egg breakfast cups, flavored with goat gouda and basil, they were amazing!

Aren’t you already excited just looking at this?

Even Raw this looks delicious!

Eggs, Cheese, and Basil…Wrapped in bacon? Yes please.

Alright! I am done taunting you 😛 Here is the recipe for your morning enjoyment!

Bacon, Goat Cheese, and Basil Egg Breakfast Cups

[gmc_recipe 2045]

Oh! Don’t forget to serve these at a most awesome tea party!

So fancy!

Not proper behavior for a tea party….

Pretty sure my little ladies do not care about the proper way to behave at a tea party 😛

Thank for Looking!

Happy Baking

♄

Samantha

ps.

sorry about the thumbnails…I don’t really know what’s up with that!

Easter Egg Dying

Homemade Easter Egg Dye

So Easter is in oh,  5 days? right?… I haven’t prepared, decorated, or planned a single thing. What is the matter with me?! Maybe I should take this year off?…or maybe I can scrounge up some yummy photos of the delicious Quiche I normally serve.

We usually put on a large brunch followed by an easter egg hunt in the backyard… *sigh* I use to have the prettiest back yard in the spring.  We usually top everything off with some of the first strawberries of the season. Fresh Strawberry Lemonade and Fresh Strawberry Pie… ~yum

I guess I am just not feeling as pumped as usual… Who would come to my Easter Brunch?…my little ladies I suppose. Ok, I guess I’ll stop feeling sorry for myself for a minute and share my post from last year.

We tried our hand at homemade Easter Egg Dye last year and I absolutely loved the results…hopefully I will have a chance to make it happen again before Sunday rolls around.

So if you missed it last year, you have another chance!

To view the full post and dye recipe click here!!!

Pretty!

 Yes, yes, I know this is a cop out post but It’s all the energy I have at the moment 😛

Happy Easter

♄

Samantha

A Quest for a Healthier State of Living

A New Health Regime For Me

Welcome to my Quest for a Healthier State of Living Weekly Journal

Well if anyone knows me, they know that I am perpetually exhausted.  Yes, I know, the joys of motherhood. Yes, it will pass. Yes, it comes with the territory…and all that jazz.

And while all this is true and I appreciate the sentiment there is more to the story.

The real facts are I am overweight, I have poor sleep habits, I yo yo between healthy eating and stuffing my face with cheese and carbs, and I have terrible time management skills. Add my two daughter’s 19 months apart, a house to care for, too many pets and plants, an exhausted husband, crippling PMS every month, and oh, yeah, my attempt at a home business, is it really no wonder I am extremely tired most days?  😩

I want to change all this. My eldest daughter is coming up on kindergarten this fall and I feel like I might actually have to attempt to be a real adult by this time…sad face. SO! time for a change, right?………….

Ideally I would like to achieve a state of living where I am up most mornings before my family to start my day with a little piece of mind. I am eating healthy yet not feeling deprived. I have enough energy to run my household and have patience with my daughters.  I have time to dedicate to my business and home. Most of all, I want to feel happy and fulfilled in all that I do!

To start I have put together a routine for myself (mostly focusing on getting in shape, at this point) I’m sure it will change and evolve as time goes on.

  • Be asleep no later than 11 most nights, preferably by 10:30.
  • Wake by 6:30 am at the latest.
  • Walk my dog every morning.
  • Practice Yoga at least 3 times a week.
  • Eat sensibly and regularly so I do not overeat by the end of the day.
  • Practice Oil Pulling, Drink Lemon Water every morning, and enjoy Apple Cider Elixir ever afternoon.
  • Take a nap when my body is telling me I need more rest.

Small but sensibly start I think. I will be posting an extra post each week journaling my progress and explaining further some of the practices I am using to help get in shape 🙂

By all means please feel free to follow along, ask questions, and Please, I would love to hear your feedback and opinions. Most importantly, keep me accountable!

  • What do you do to stay energized?
  • What do you do to keep in shape?
  • What tricks or solutions do you have for eating right when your exhausted?
  • Do you practice oil pulling? How did it work for you?
  • Do you detox with apple cider vinegar?

Have an amazing day

♄

Samantha

Crustless Cheddar Broccoli Quiche

Cheddar Broccoli Quiche

20130225-214039.jpg

I was going to wait to post till tomorrow but since I had a request from a follower for the recipe for my dinner this evening I figured I could post one real quick while watching Freaks and Geeks.

The recipe is simple
And so perfect to throw together on an evening when you don’t have much energy 🙂

Crustless Cheddar Broccoli Quiche

Ingredients
~~~~~~~~~~~~~~~~~~~~~~~~~~~~~
‱ 6 eggs, beaten
‱ 1/2 cup heavy cream
‱ 1 1/4 – 1 1/2 cup cheddar cheese, shredded
‱ 1 1/2 cup frozen or fresh Broccoli, cut up
‱ 2 Tablespoons dried onions, minced
‱ 1/2 teaspoon garlic powder
‱ coarse salt and ground black pepper, to taste

Directions
~~~~~~~~~~~~~~~~~~~~~~~~~~~~~
1. Preheat oven to 425 degrees F.
2. Sauté broccoli with dried onions, garlic powder, salt and pepper, and a small amount if olive oil in a frying pan.
3. Whisk together eggs and heavy cream.
4. Stir shredded cheese and sautéed broccoli into egg mixture until well combined.
5. Pour into a pie plate or casserole dish and bake for about 30 minutes. Quiche should pull away from the sides and brown around the edges. It should not jiggle in the center when you pull it out. Let rest for about 5 minutes before you cut into it.
6. Eat and enjoy!

Happy Cooking
❀
Samantha

No Yeast Homemade Pizza

Quick and Easy Homemade Pizza

Want pizza for dinner? But, don’t want the cost of ordering in or the hassle of homemade pizza dough?

Well then! I have a solution for you 🙂 I while back I posted a recipe for Quick and Easy Hamburger Buns…You should check it out! Anyways, I’ve been so pleased with this super easy and highly affordable way to have some buns in the house, like stat!

So…to the point. One evening my girls were begging me…”Mommy, please, please, can we have pizza for dinner,” and after several attempts of trying explain to them that I did not have the money to order in and it was way to late to start prepping pizza dough, I started to consider tortilla pizzas…and then I had an awesome idea! Maybe, I could swing it with the no yeast bun recipe?..??? and, I did!

I mean, come on! That looks amazing, right?

Now, before you venture forth, there are somethings you must understand.

  1. This is NOT a yeast crust. Do not expect the same chewiness yeast provides.
  2. Although easy, this crust still requires some bread baking skill 🙂
  3. If you happen to be a pizza elitist then turn back now.
  4. Don’t worry 🙂 The pizza although not as traditional is quite delicious!

 Ok, first your going to want to visit the recipe here or at the bottom of this post 🙂 If you’re using a pizza stone, place it in the oven and preheat. If you are using a regular cookie sheet or pizza sheet you may roll the crust out directly on that. I use a pizza peel (which I love).  Generously spread cornmeal over the entire service. This helps it to slide off easily and add texture and taste to the crust. Using well floured hands separate your dough in half (remember, this dough is super sticky) Shape half your dough into a disc and place on the pizza peel. Using your rolling-pin, roll the dough out evenly, flouring the entire time.

Slide the dough on to your preheated pizza stone, or just place in the oven if you’re using a regular baking sheet. Cook from 2-4 minutes, to help your dough set up. Then pull out of the oven to put your toppings on.
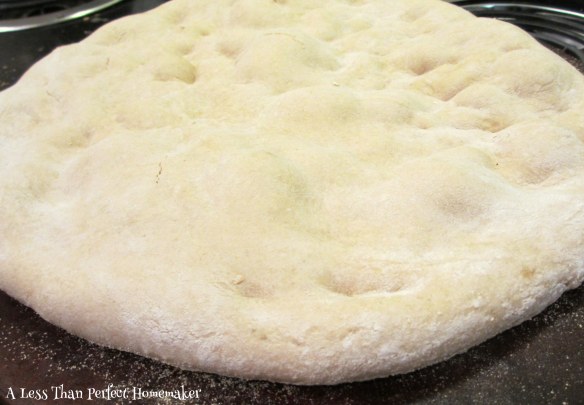
At this point, you are free proceed with whatever toppings strike your fancy. I usually spread olive oil over the crust, followed by sauce. Then comes a good helping of mozzarella cheese, a small bit of cheddar, some pepperoni and a sprinkling of parmesan.

Once you have the crust covered with toppings, place it back in the oven for 5-10 minutes. You can always turn the oven to broil the last couple of minutes to brown the cheese (which my husbands loves). Just make sure you watch it when it’s broiling, it is like a law of nature or something for things to burn under the broiler if you stop paying attention for the slightest second! Also, while your pizza is finishing cooking you can start preparing the rest of your dough.

Let the pizza rest for a few minutes before cutting it.

Finally. Eat and Enjoy!

This was a HUGE hit in my home! Definitely worth a try 🙂

*Note*

Feel free to separate the dough even more, for personal style pizza, just don’t roll the crust too thin.

[gmc_recipe 1389]

Happy Cooking

♄

Samantha

Quick and Easy Hamburger Buns

Homemade Thin Buns

If your anything like me, you decide what’s for dinner about half an hour before your suppose to start preparing it. This usually leads to things like spruced up Ramen and breakfast for dinner in my home 🙂 Or frozen chicken burgers on regular sandwich bread.

The other night though, I just didn’t want sandwich bread, or maybe I didn’t have any? Who remembers? But, as usual I did not leave myself enough time to actually make buns so I went in search of buns without yeast.

I found a simple recipe that called for baking powder. The recipe was much like Indian Fry Bread. The only changes I made was to add more whole wheat flour and an egg. The egg adds to the texture and helps the bread stay longer.

I was pleasantly surprised with this simple recipe ♄ The buns have a mild rustic flavor and a nice texture…with just enough crunch to the outside.

If you’re looking for a thick, soft hamburger bun then this is not the bun for you. However, if you enjoy a more artisan style burger these would make a great addition to your meal.

So! If you’re in need of a quick alternative to a hamburger bun then here is the recipe for your enjoyment.

Don’t forget to check out my post No Yeast Homemade Pizza where I turn this recipe into delicious pizza 🙂

[gmc_recipe 1389]

Note*

You can choose to shape the dough out with corn meal, sesame seeds, or oatmeal for a different texture. Just don’t get too much flour on them when shaping or nothing else will stick to the dough 🙂

Also, feel free to use all white flour if you do not have a taste for wheat.

Happy Baking

♄

Samantha

Resource:

http://benotsimplygood.wordpress.com/tag/hamburger-buns/

Happy Birthday Little Munchkin

This past weekend we celebrated my oldest daughter’s fifth birthday…Gosh,that blows my mind! We just moved so we don’t really know a lot of people and funds are tight due to the move so we weren’t real sure how everything would go down.

We opted to take her somewhere so fun she would forget about the lack of guests at her birthday party later that day…(she is such a social butterfly).

So we headed out to a local mall and each ordered a different lunch from the international food market there, then we took her and her sister to an awesome soft gym for kids inside the mall! The gym was entirely soft and included things like a moving jungle gym, a balloon pit, and a strange tilting carousal that you had to hold on to.

*please excuse the blurry iPhone photos*

I think this more than made up for the very quiet party we were having later.

After the gym we allowed the Birthday Girl to pick out a new party dress and headed home to meet a small group of guests.

We had make your own pizza for dinner and for dessert we had some not so perfect cupcakes..haha. They tasted amazing but didn’t quite turn out like cupcakes are suppose too….I might have added a bit too much sugar

This is what you get when you rush cupcakes ♄

The Birthday Girl in her new dress ♄

After we all sung Happy Birthday we opened presents. Thank you Grandma and Grammy for the new Lalaloopsy sets! She was especially excited about a new dress for Princess Baby, her most prized possession.

Princess Babies new dress even out shined the adorable princess gown her Mommy painstakingly made with her own hands…

We finished the night off with AristoCats which she got from her Daddy.

Even without all the bells and whistles we usually pull out It was an amazing day. I am so proud of my little lady and so honored to have spent the day making her feel as special as she is!

Have a wonderful Week

♄

Samantha

Homemade Refried Beans

Homemade Refried Beans

I have so many dried beans lying around the house, I always plan to soak them and freeze them for use later like any decent homemaker would, right?…….. Suffice to say, that has never happened. Not once. I love the idea but maybe not so much the work. *sigh*

But my new year is bringing all sorts of new energy (not really, but I’m pretending) so I took on the task.. Or at least part of it. I managed to soak the beans overnight (for once) and cook them the next day, and then I even turned them into Refried Beans!!

If you are feeling as energetic as I have been I thought I would share the process 🙂

Refried Beans

This is a two-day process so give yourself a day ahead. Of course you are always welcome to soak and cook the beans ahead of time and store in your freezer…which I will be doing from now on ;).

First you want to rinse and soak your beans. 3 cups of water to one cup of beans is the rule of thumb. For this recipe I soaked 2 cups of dried beans in 6 cups of water. Put a lid over your soaking beans and set aside for the night.

The beans should cook for at least three hours so make sure you start the cooking early enough. Cook beans in soaking water covered over medium heat until beans are soft and tender.

When beans are fully cooked melt 1/4-1/3 cup of lard in cast iron skillet over medium heat.

When the lard is fully melted add 1 cup of cooked beans and 1/2 cup of cooking broth slowly.

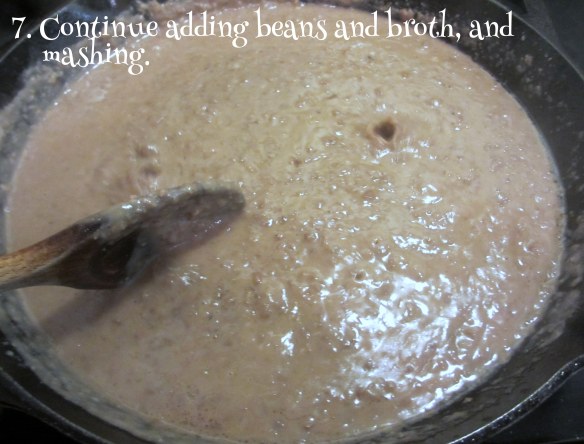
Mash beans into lard (carefully) with a potato masher.

Continue adding beans and cooking broth, mashing in between, until all the beans and broth are gone.

Continue cooking and stirring over medium heat until all the liquid has evaporated. Add any salt and pepper or other seasonings at this time.

Eat and Enjoy.

And yes, if you’re wondering, that is meatloaf. Mexican meatloaf! A recipe made by my sister and myself several years ago!

*Note*

Feel free to add seasonings during cooking the beans, such as: bay leaves, jalapeno, onions, cilantro….get creative!

Happy Cooking

♄

Samantha

Pumpkin Coconut Soup Recipe

Leftover Winter Squash, Delicious Pumpkin soup

If your anything like me you buy WAY too many pumpkins come Halloween and Thanksgiving…yes I am so guilty.

I love pumpkins. It’s such a simple fact. I don’t know what it is, they just make me feel so good inside when I look at them. I dream of having a pumpkin patch someday….but, I digress, back to the subject at hand.

I buy too many pumpkins…blah, blah, blah, and for this reason I try to buy a few for their nutritional value as well as their appearance. Now, all pumpkins are delicious and nutritious but, some do have a little more packed into their orangey flesh.

Take this Blue Lakota I have had hanging around since October, It is an heirloom variety and has a light squash flavor and a fresh almost cucumber scent. There is enough flesh for a couple batches of soup and maybe two pies or some pumpkin bread. She is loaded with beta-carotene and plenty of other minerals and vitamins along with antioxidants! Something we all could use in the long winter months 🙂

So my first recipe to be honored with her presence this winter was a Coconut Pumpkin Soup..Which was delicious. My little ladies didn’t think much of it but I think I will just pretend they like it until they actually do!

And now, for your eating enjoyment and winter comfort.

Coconut Pumpkin Soup

First you are going to want to roast and purée your pumpkin.

  1. Preheat oven to 350 degrees F. Cut pumpkin in half.
  2. Scrape out seeds and stringy stuff (blah) as my ladies would say.
  3. Place in a casserole dish or roasting pan. Fill with one inch of water.Roast for about an hour or until pumpkin is tender when pierced with a fork.
  4. Scrape pumpkin flesh away from skin with a large spoon.
  5. Load cooked pumpkin into your food processor.
  6. Process cooked pumpkin until it has a smooth even consistency.

Second, you are going to want to prepare your soup according to the recipe or don’t 😛

How does this not look delicious?!

Alright, enough of my babble, here is the recipe. Enjoy!

[gmc_recipe 1268]

Happy Cooking

♄

Samantha