October Unprocessed Week 3 Homemade Ketchup

October Unprocessed Week 3

I do realize I am a couple of weeks past the third week of this challenge, however! I still wanted to follow through with it!

For week three I put together homemade ketchup 🙂 Although not my favorite condiment my hubby loves it and I didn’t think it would hurt for him to have a healthy option.

Homemade Ketchup

 October Unprocessed


Ingredients:

  • 6 oz of tomato paste
  • 1/4 cup of honey
  • 1/2-1 cup of vinegar
  • 1/4 cup of raw or brown sugar
  • 3/4 teaspoon sea salt
  • 1/4 teaspoon onion powder
  • 1/4 teaspoon garlic powder

Combine all ingredients in a saucepan over medium high heat, whisk until smooth.

IMG_0094


When mixture comes to a boil, reduce heat and simmer for 20 minutes, stirring occasionally.

IMG_0096


Let cool completely, store in an airtight container in the fridge. Should last anywhere from 1-4 weeks but please do not quote me on that! 

IMG_0099


*Note*

~ Recipe adapted from SkinnyTaste.com

~ I found the original proportions to be to bitter so I started with the original portions and then added extra sugar and vinegar to taste. I have not had a complaint yet, so I would start out small and then add to your own taste. 

Happy Cooking

Samantha


October Unprocessed Week 2

Homemade Butter Recipe

So here we are week 2 of October Unprocessed has come and gone! I realize this is technically posting into the third week…but as you know, life gets away from me 🙂 If you are unsure of what October Unprocessed is follow this link. Basically I took a pledge to eat unprocessed (or the best I can) for the month of October….

I chose to feature 4 homemade recipes for the challenge and for week two I made homemade butter 🙂 If you missed the first week which was Homemade Ranch click here.

The little ladies and I pushed up our sleeves and shook our way to the most delicious and fresh butter ever!

Homemade Butter

Ingredients:

  • 16 oz Heavy Whipping Cream
  • Sea Salt (to taste)
  • Mason Jar

First you want to set your cream out to come to room temperature. It takes less time for the butter to separate from the cream I guess.  We just set ours out in the jar and bonus Classico jars already have oz measurements on them!

Set out the cream to come to room temperature.

Make sure the lid to your jar is secure and then proceed to shake, shake, shake! Enlist help from littles when possible! Should take about 15 minutes for the butter to separate from the milk.

Shake the heavy cream until the butter separates from the milk.

Always display a positive attitude.

Almost there…..just a little longer.

When the butter has completely separated it should look something like this:

The butter is fully separated and ready to rinse.

After you have shaken, and shaken, and you can shake no more you are going to line a mesh strainer with cheesecloth or in my case a tea towel and then place this over a bowl. Fill another bowl up with cold water and ice and place in the sink.

Poor your butter and butter milk out into the lined mesh strainer and let as much of the buttermilk drain as possible.

Let the butter drain once more.

Pull your drained butter out by the cheesecloth/tea towel and start dipping it into the ice water. This is to finish rinsing the buttermilk off of your butter. Helps keep it from going sour. In addition I let the butter drain once more before I salted it.

Butter is ready for seasoning.

Salt butter to taste…once again enlist help from the littles 🙂

Salt your butter to taste.

Go ahead and taste the left over buttermilk because you should always just taste everything 😛 You can save this buttermilk for later..yum! Pancakes later maybe?

Taste the buttermilk?

You are finished! You can shape and wrap the butter with plastic wrap or waxed paper. I put mine into an airtight container. I will try to shape it as I get more confident at making it.
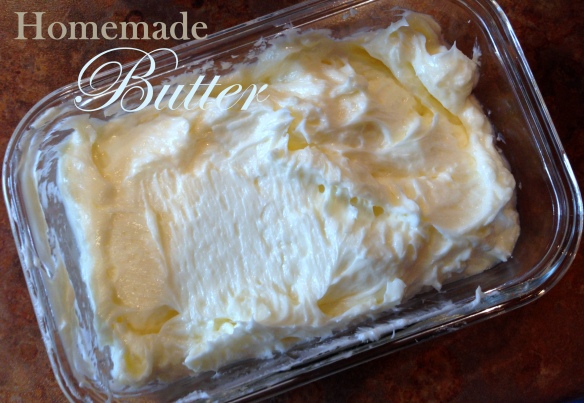
Enjoy some of your butter and then refrigerate.

Most important part! Eat and Enjoy! You should probably just by default have a warm loaf of bread available to smother it with…Just sayin.

Happy Cooking

Samantha

Homemade Ranch Dressing, Week 1 October Unprocessed

So I made it through week one of October Unprocessed “mostly” unprocessed. Mainly I just refrained from eating overly processed foods in the house which led to me just eating less….Haha!

I did put together some homemade ranch for a really delicious salad and the recipe I used makes enough for several batches! This is a yummy dilly style ranch dressing. The dressing taste amazing but is rather runny so next time I will add a little sour cream or use buttermilk to thicken it slightly.

Homemade Ranch Dressing

First you are going to want The Homemade Ranch Dressing Seasoning recipe, click the link or see recipe below.

To make the dressing:

  • 2 Tablespoons Ranch Dressing Seasoning
  • 1 Cup mayonnaise
  • 1/2 Cup Whole Milk
  • 1/2 Cup Sour Cream
  1. Mix all ingredients in a glass jar and shake vigorously! Refrigerate until ready to eat.
  2. Eat and Enjoy.

Dressing will keep for about two weeks. Store extra seasoning in your cupboard 🙂

*~* Note *~*

You can replace the sour cream and milk with drained plain yogurt, or you can use all sour cream or buttermilk. Get crazy up in there!

Also, you may replace the dried dill with 1 tablespoon of fresh when preparing dressing. I also like to add fresh green onions… because I just love them.

[gmc_recipe 2120]

Happy Cooking

Samantha

October Unprocessed Challenge

A Quick Update

This coming month of October I have accepted the October Unprocessed Challenge! I thought it could be a good way to get my eating back on track and also hold me accountable to post 😉

If you would like to read about the challenge and better yet join follow the link below

October Unprocessed

Each week I will not only update you on my progress but I plan to share a non-processed, homemade recipe 🙂

And the line up is……..

Week 1: Homemade Ranch

Week 2: Homemade Butter

Week 3: Homemade Ketchup

Week 4: Homemade Mozzarella Cheese

So, if your up for it go ahead and cheer me on and lend your support. Don’t forget to look for a new recipe each week!

Happy Healthy Living

Samantha

Sauteed Fern Fiddle Heads

Foraging for Food

I love the idea of foraging, I dream of hiking through the woods with my girls, harvesting wild berries and mushrooms, trapping a pheasant…..

Someday we will learn. For now, I stick to things I know, like blackberry bushes and fern fiddle-heads!

Spring has sprung here in the Pacific North West and my bit of forest behind the complex is alive with green and new life!

A recent trip brought me upon some very pretty wild flowers and fresh fern shoots.

This is rare flower and you should NOT pick it! I just learned this from my adopted Mother-in-law Angie 😉 It is a Western Trillium, the plant takes a very long time to recover if you pick it… So we will just enjoy looking at it!

Some fiddle heads… a little past their prime… Seeing these made me think of my sister and how she told me you can eat them. I never knew that! So I decided to venture out with the little ladies and harvest some.

Most of the fiddle heads I harvested were slightly past prime munching stage but I went ahead with it anyhow…

They had a slightly woody taste and texture, I’m guessing they are much more tender when harvested younger. Still, sautéed up with a little olive oil and some other veggies they had a nice earthy flavor and made me feel close to my roots.

I had a more elaborate recipe to try from my Wild Table cookbook but I felt I didn’t scrounge up enough to call for the ingredients and time it would have taken.. So I came up with my own little concoction.

So! If you are going to be harvesting fiddle heads here soon…..

Sautéed Fern Fiddle Heads with Asparagus, Shallots, Mushroom, and Green Onions

  • Fern Fiddle Heads (however many you can harvest)
  • 1/2 Bunch Asparagus
  • 4 Mushrooms (any kind)
  • 1 Shallot
  • 1 Bunch Green Onions (whites removed, cut lengthwise)
  • 1 Tablespoon Olive Oil

Clean fiddle heads, rub off any brown hairy fuzzy stuff 🙂 Rinse the rest of your veggies. Heat oil over medium high heat. Add shallot and sauté till fragrant. Add fiddle heads, asparagus, green onions, and mushrooms. Saute over medium high heat until tender crisp, or longer if you prefer. Eat and enjoy!

Get creative! You can double this amount, triple, whatever you need 🙂 I’m sure whole cloves of garlic would add a lovely flavor, Just enjoy harvesting and eating what Mother Nature provides for us ♥ Please forage responsibly.

Other sources:

http://www.urbanhuntress.com/2013/04/foraging-fiddleheads/

http://dnr.alaska.gov/ag/akpmc/publications/pdf/Fiddleheads.pdf

http://norecipes.com/blog/forage-feast-ramps-fiddleheads-stinging-nettles/#sthash.p34T8oJt.dpbs

http://www.ifood.tv/blog/how-to-store-fiddlehead-ferns

Happy Foraging

Samantha

Healthier State of Living Week 2 Update

Weekly Update

Once again, I find myself lagging in the posting department this week 😦 Life happens. If you missed my last update you can find it here.

Week 2 Goals:

  1. Be asleep no later than 11 most nights, preferably by 10:30.
  2. Wake by 6:30 am at the latest.
  3. Walk my dog every morning.
  4. Practice Yoga at least 3 times a week.
  5. Eat sensibly and regularly so I do not overeat by the end of the day.
  6. Practice Oil Pulling, Drink Lemon Water every morning, and enjoy Apple Cider Elixir ever afternoon.
  7. Take a nap when my body is telling me I need more rest.
  • I went to sleep by 1am almost every night since my return from Redding (daylight savings!)
  • I was up between 7-8 (daylight savings)
  • I walked my dog everyday (improvement)
  • I did not practice yoga even 1 day (seems I traded walking for yoga 😦 )
  • I ate MUCH better! I cooked a sensible meal almost every evening with little to no cheese, added veggies, lean meat, and whole grains. I was good about stopping before my full meter was up. (I feel good about this one)
  • I practiced oil pulling 4 days out of 7. I did not drink lemon water at all (I am better set up this week) I drank apple cider elixir 4 nights.
  • I took several naps.

I did not meet all my goals in week 2 but I’m going to give myself a break. Week two followed are fly by trip to Redding and I think I can be human for one week. Only one though. 

I am going to keep all my goals the same until I meet them. I don’t think they are overwhelming or impossible so lets see if I can make week three! I lost 3 pounds and I do feel more energetic so I am on the right track 🙂

A Note on Apple Cider Vinegar

The list of health benefits for apple cider vinegar is long but I am only going to touch a few. I decided to incorporate it into my diet to help with weight management, PMS symptoms, sinus discomfort, acne, to keep my urine at a more acidic state, and as an overall detoxifier.

For more info and benefits please follow these links:

http://www.webmd.com/diet/apple-cider-vinegar

http://www.mindbodygreen.com/0-5875/15-Reasons-to-Use-Apple-Cider-Vinegar-Every-Day.html

http://www.globalhealingcenter.com/natural-health/the-benefits-of-apple-cider-vinegar/

I stumbled upon a delicious recipe for an Apple Cider Elixir on pinterest, which of course led me to read up on it. After reading on the benefits I decided it was worth a go. You can find the recipe I use at Delighted Momma. I was nervous at first but honestly, this recipe is delicious! The only change I add is to substitute honey for the stevia syrup.

I don’t think I have drank it regularly enough to notice a huge effect but I am more regular on the days that I drink it. My skin has smoothed out slightly.

Next week I will cover the benefits of drinking lemon water and post a progress picture 🙂

See you then!

Samantha

My Healthier State of Living, blah, blah, blah, Week 1 Update

Weekly Update

So sorry for my complete lack of posting in almost a week 😦 We recently made a flyby  trip to Redding to see some friends and family, so my update is not so spectacular. If your coming to the party late please see my previous post on My Quest for a Healthier State of Living

Week 1 Goals

  1. Be asleep no later than 11 most nights, preferably by 10:30.
  2. Wake by 6:30 am at the latest.
  3. Walk my dog every morning.
  4. Practice Yoga at least 3 times a week.
  5. Eat sensibly and regularly so I do not overeat by the end of the day.
  6. Practice Oil Pulling, Drink Lemon Water every morning, and enjoy Apple Cider Elixir ever afternoon.
  7. Take a nap when my body is telling me I need more rest.
  • I made it to bed most days last week by midnight. (So not a great start in that area, and now I have day light savings to contend with)
  • I woke up around 7:30, my children’s usually wake up call… (needs some work)
  • I walked my dog one evening with a friend. (starting to see a pattern here)
  • I practiced yoga 2 days out of my intended three. (not bad)
  •  I ate a lot at of everything, at every meal. (I have a problem)
  • I practiced oil pulling, lemon water, and apple cider elixir 4 days out of 7. (not bad)
  • I took some naps on the car trip (does that count?)

 I think week two might just be a redo of week one so I will keep the goals the same. I am already halfway through week 2 so I better step up my game!

A Note on Oil Pulling 

Oil pulling is the practice of swishing a 100% all natural vegetable oil around in your mouth from 15 to 20 minutes. This is an age-old process used to fight gum disease, reverse cavities, whiten teeth, detox the body, and to fight a range of illnesses. It is believed to boost your immune system function by pulling toxins out of your body through your mouth.

Please see references below:

Oilpulling.com

oilpulling.org

WikiOilPulling

 I am using a 100% extra virgin olive oil but would like to switch to either sesame oil or coconut oil. You can also use sunflower oil. You must make sure that it is pure unadulterated vegetable oil for it to do anything.

The first time I tried I had to spit the oil out after 5 minutes but I just tried again, Also my jaw got terribly tired. I found that I was trying to hard and that this also ups your gag reflex. The taste is not terrible but the consistency is something to get use to.

I have not noticed a great change in the whiteness of my teeth yet but I am optimistic. I will say that I have terrible dental health, I have 15 cavities all together and am in need of one root canal. My teeth ache on a regular basis, they give me headaches and pain my sinuses. The very first day of oil pulling my worst cavity felt cleaner that it has since before my second child was born. Within three days my whole mouth felt much cleaner and barely achy.

I have noticed terrible morning breath, which I don’t think I suffer from?… and I was unusually tired, and weak feeling. I think these are symptoms of detox?.. There are other factors as well, the lemon water, apple cider vinegar, and of course I am perpetually experiencing premenstrual syndrome…….

I will continue to practice all three, I figure it’s not hurting anything.

I will try to cover the benefits of lemon water and apple cider vinegar over the next couple of weeks.

Here is a candid shot of me sans makeup 🙂 I will post progress pictures to see how my teeth and skin are fairing.

*On another note*

I enjoyed a pleasant weekend with friends and family, got a small Mommy break from the in-laws, thank you. I feel positive about the future and I have a great new knife set to enjoy! Thanks Grammy! ♥♥♥

Till Next Week

Samantha

Canned Homemade Applesauce

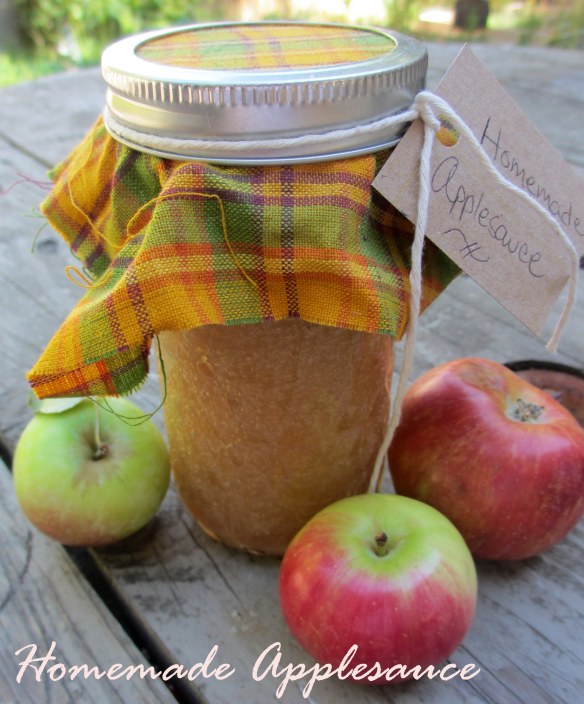
Homemade Applesauce

Recently I posted about the bounty of my neighborhood in Neighborhood Bounty.. In The post I mentioned meeting a new neighbor and obtaining some fresh apples.

I decided to turn those apples into the most delicious homemade applesauce with my friend Cassie 🙂

Have you ever peeled tiny apples? Oh My! It was time-consuming. Peeling, cutting, cooking, and jarring took us a better part of a whole day but we had a lot of fun and the applesauce has such a robust flavor. Not at all like what you find at the store.

If you would like to make your own applesauce here are the instructions:

1. Obtain fresh apples from a nice neighbor or friend. (the amount is not entirely relevant, you just need a good amount)

2. Peel and Cut those apples

3. Cook apples and can according to your canning method 🙂

 Applesauce Recipe:

  • large amount of apples
  • raw sugar
  • fresh lemon juice and peel
  • water
  1. Peel and cut apples. Squeeze lemon juice over cut apples to prevent them from turning brown.
  2. Fill a stockpot with your apples, lemon peel and just enough water to barely reach the top of your apples (this prevents burning). Cook over medium high heat until apples start to break down.
  3. remove from heat and mash down with a potato masher to your favorite consistency.
  4. Add sugar to taste.
  5. Can according to your Canning method.
  6. Enjoy!

*note*

This applesauce tastes delicious in oatmeal!

Happy Canning

♥♥♥

Samantha

Shelling Your Own Nuts

If shelling your own nuts isn’t homesteading it, I don’t know what is!

These pecans were given to me compliments of Grammy ♥

Sarah deserves the credit for this post however…This was originally going to be her post…She shelled these for an entire afternoon (with help from the kids). I think we came up with enough for at least one Pecan Pie this Thanksgiving!

Well that’s all.

Happy Shelling

♥♥♥

Samantha